Posts

Understanding Swagger and OpenAPI Specifications

Understanding Swagger and OpenAPI Specifications In modern API development, Swagger and OpenAPI have become the go-to tools for designing, documenting, and interacting with RESTful APIs. Let’s break down these essential tools and how they simplify API development. What is OpenAPI? The OpenAPI Specification (OAS) is a standard format to describe REST APIs. Initially known as the Swagger Specification, it was created by Swagger, then donated to the OpenAPI Initiative in 2015. Today, OpenAPI has become the industry standard for describing APIs, making it easier for developers to understand and work with APIs across various platforms. An OpenAPI document provides a structured description of the entire API, including: Endpoints and available operations Input parameters and output formats Authentication methods Error messages and responses Here’s a quick example of an OpenAPI specification snippet in JSON: {

Flux vs Argo CD in GitOps

Flux vs Argo CD in GitOps: Which One is Right for You? In the context of GitOps , both Flux and Argo CD are popular tools for continuous deployment (CD) automation. They manage Kubernetes applications using Git as the source of truth. While both are great options, they differ in several aspects, from architecture to feature sets. In this post, we’ll compare Flux and Argo CD to help you decide which is the right tool for your Kubernetes environment. 1. Architecture Flux: Flux is a pull-based system that continuously reconciles the state of the cluster with the state in Git. It watches your Git repositories and automatically updates Kubernetes resources when it detects changes. Flux is lightweight and integrates with the CNCF ecosystem. It also supports Kustomize and Helm natively. Argo CD: Argo CD is also a pull-based tool but provides a declarative user interface for visual feedback on application status, health, and syncing. Ar

Install Docker on Debian 12 (Bookworm)

Image
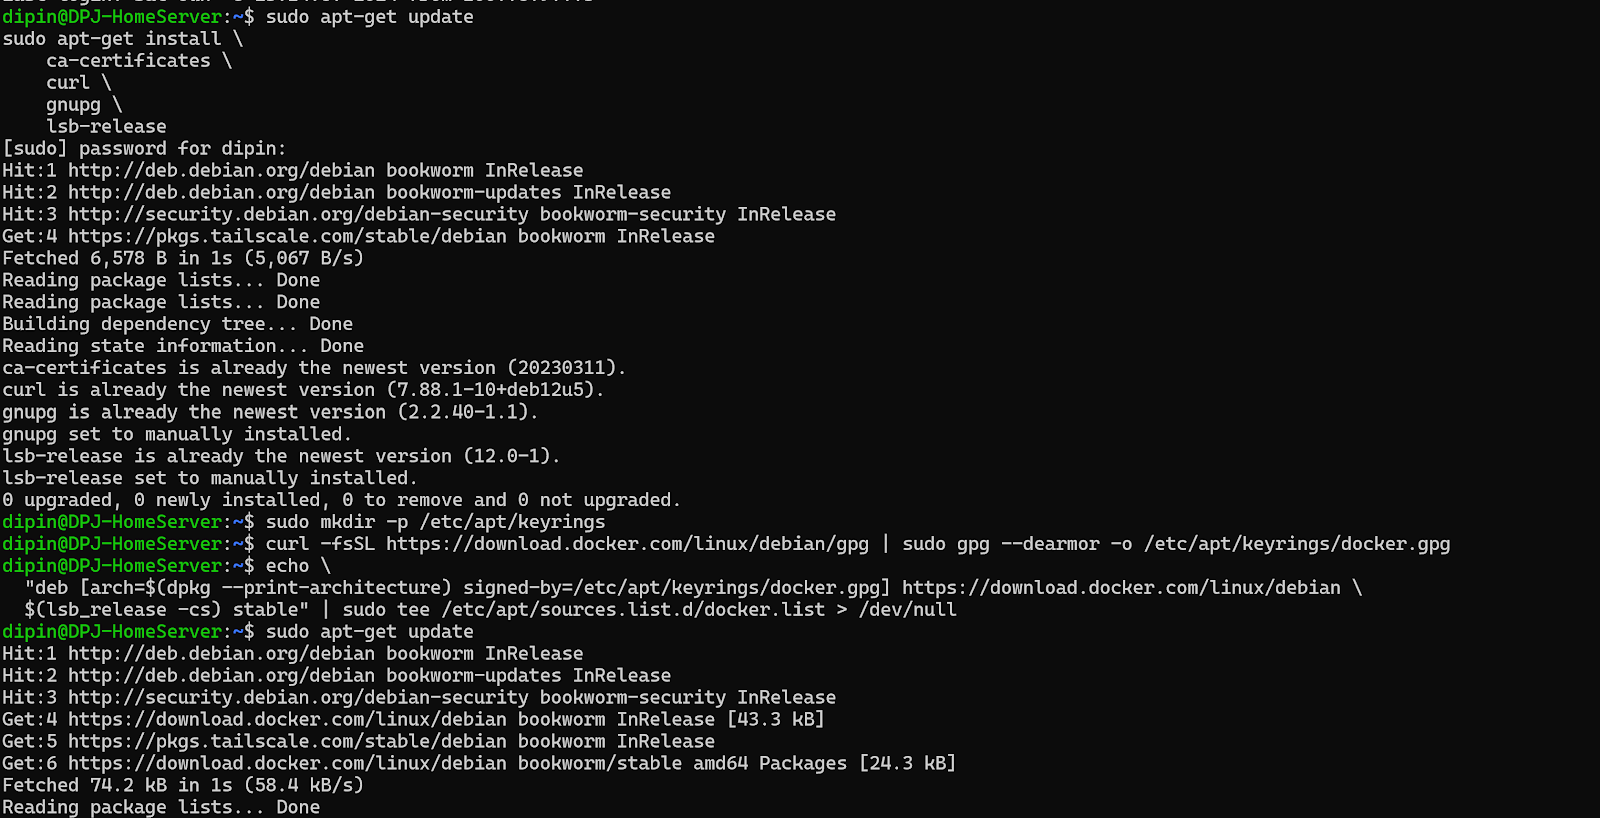
How to Install Docker on Debian Docker is a popular platform for developing, shipping, and running applications inside containers. This guide will show you how to install Docker on a Debian-based system. Step 1: Update the Package Index and Install Necessary Packages sudo apt-get update sudo apt-get install \ ca-certificates \ curl \ gnupg \ lsb-release Step 2: Add Docker’s Official GPG Key sudo mkdir -p /etc/apt/keyrings curl -fsSL https://download.docker.com/linux/debian/gpg | sudo gpg --dearmor -o /etc/apt/keyrings/docker.gpg Step 3: Set Up the Docker Repository echo \ "deb [arch=$(dpkg --print-architecture) signed-by=/etc/apt/keyrings/docker.gpg] https://download.docker.com/linux/debian \ $(lsb_release -cs) stable" | sudo tee /etc/apt/sources.list.d/docker.list > /dev/null Step 4: Update the Package Index Again sudo apt-get update Step 5: Install Docker Engine, containerd, an

Managing Multiple SSH Keys for Different Machines

Managing Multiple SSH Keys for Different Machines In today's interconnected world, it's common to access multiple remote machines via SSH. However, managing different SSH keys for various machines can be a bit challenging. This blog post will guide you through the process of generating and adding multiple SSH keys on a single computer, making your workflow seamless and efficient. Step 1: Generate SSH Keys To start, we'll generate a unique SSH key for each machine. Open your terminal and use the ssh-keygen command: ssh-keygen -t rsa -b 4096 -C "your_email@example.com" -f ~/.ssh/id_rsa_machine1 ssh-keygen -t rsa -b 4096 -C "your_email@example.com" -f ~/.ssh/id_rsa_machine2 Replace machine1 and machine2 with appropriate identifiers for your machines. Step 2: Add SSH Keys to the SSH Agent Next, we need to add these keys to the SSH agent, which manages your SSH keys

Adding Multiple SSH Keys to Your Raspberry Pi

Adding Multiple SSH Keys to Your Raspberry Pi If you're a Raspberry Pi enthusiast, you know the importance of secure access to your device. Using SSH keys is a secure and convenient way to manage remote access. In this guide, I'll show you how to add multiple SSH keys to your Raspberry Pi, allowing different users or machines to connect securely. Step 1: Generate SSH Keys First, you need to generate SSH keys on each client machine that will access your Raspberry Pi. Open a terminal on your client machine and run the following command: ssh-keygen -t rsa -b 4096 -C "your_email@example.com" Follow the prompts to save the key in the default location ( ~/.ssh/id_rsa ) and optionally add a passphrase for extra security. Step 2: Copy SSH Keys to Raspberry Pi Next, you need to copy the SSH key to your Raspberry Pi. The easiest way to do this is by using the ssh-copy-id command. Replace pi@raspberrypi with your

Transferring Data Between PostgreSQL Docker Containers

Transferring Data Between PostgreSQL Docker Containers Docker containers provide an efficient way to package, distribute, and run applications, including databases like PostgreSQL. Often, you may need to transfer data from one PostgreSQL container to another, either for backup, migration, or testing purposes. In this guide, we'll walk through the process of transferring data between PostgreSQL Docker containers. Prerequisites Basic understanding of Docker and PostgreSQL. PostgreSQL Docker containers already running. Step 1: Export Data from the Source Container First, we need to export the data from the source PostgreSQL Docker container. We'll use the pg_dump tool for this purpose. docker exec -it <source_container_name> bash pg_dump -U <username> -d <database_name> > /path/to/export/dump.sql exit Replace <source_container_name> , <username> , <database_name> , and /path/

Pug Templating in Java

Mastering Pug Templating in Java: A Developer's Guide In the ever-evolving landscape of web development, where innovation is the currency and efficiency is king, developers are constantly seeking tools that streamline their workflows and elevate their craft. Enter Pug, a graceful templating engine that simplifies HTML markup with elegance and precision. While traditionally associated with JavaScript environments like Node.js, Pug can also be seamlessly integrated into Java projects, opening a world of possibilities for developers. In this comprehensive guide, we'll embark on a journey to master the art of using Pug in Java, exploring installation, integration, and practical examples along the way. Installing Pug for Java Before diving into the world of Pug templating in Java, let's ensure we have the necessary tools at our disposal. One convenient way to incorporate Pug into our Java project is through the use of the pug4j libra

Popular posts from this blog

Unsupervised Learning

Automate Blog Post creation using Blogger APIs and Python

Setting up Python Flask server on internet via Port forwarding

How to install Ubuntu Server and set up static IP (WiFi) on Raspberry Pi 3

The beginning of Data Quest