How to install Ubuntu Server and set up static IP (WiFi) on Raspberry Pi 3
Setting up a headless OS is always painful and imagine the situation to do it without a monitor or keyboard. Here in this post, I will demonstrate how to setup Ubuntu Server in a Raspberry Pi and connect to WiFi with a static IP. The process includes the following steps,


- Installation of Raspberry Pi Imager
- Flash Ubuntu Server to SD Card
- Initial setup of Ubuntu Server on Raspberry Pi
- Configuring Static IP in Ubuntu Server's netplan network manager.
Raspberry Pi Imager
Raspberry Pi Imager is an SDcard burner program from the Raspberry Pi foundation aimed to make installation of different OSes in the Pi easier. You can navigate to the below link to download and install Pi Imager for your operating system.
Source: https://www.raspberrypi.org/downloads/

Flash the SD card with Ubuntu Server
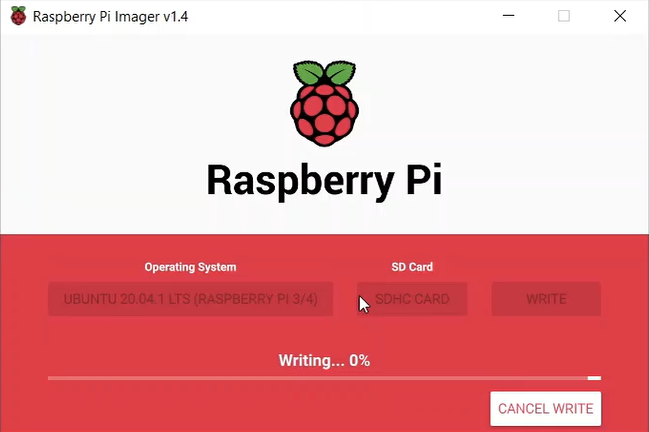
Connect an SD card (preferably with storage 16GB or more) to your laptop/PC and launch Pi Imager application. From the listed Operating Systems, choose Ubuntu Server 64 bit version. I choose the 64-bit version because it supports more applications. Then choose your SD card and tap on write button. It may take a while to complete depending on your hardware and SD card.
Initial setup of Ubuntu Server on Raspberry Pi
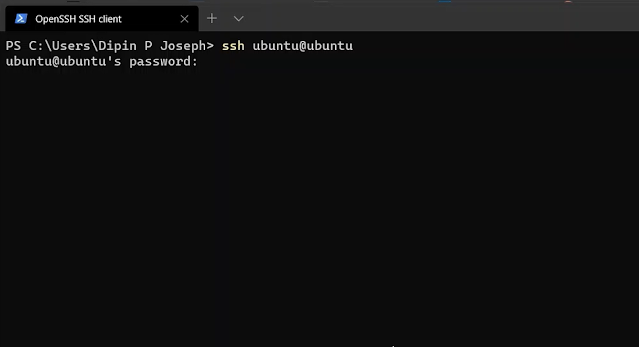
This part needs some manual effort. Remove the SD card from PC/laptop and put it in the Pi. Also, take a LAN cable and connect Raspberry Pi to the router. A LAN connection is needed at the beginning to talk with PI from our system. By default, the username, hostname and password for ubuntu server will be ubuntu itself. Alternatively, you could just log in to router (put 192.168.1.1 in a browser for this case) and check for devices connected via LAN. SSH to your Pi from the system using command, (Use tools like Putty/Windows Terminal for Windows OS)
ssh ubuntu@ubuntu

Follow those initial setup instructions, creating passwords and so on. Now, add a new user with sudo privileges for yourself by,
sudo adduser user_name# Adding to sudo groupsudo usermod -aG sudo user_name# Log into user_namesu - user_name
Source: https://www.digitalocean.com/community/tutorials/how-to-create-a-new-sudo-enabled-user-on-ubuntu-20-04-quickstart

Reboot the Pi and login as the new user. Also, don't forget to save the LAN IP. It may be useful for the future. You may change the hostname from ubuntu to your favourite by editing /etc/hostname.
Configuring WiFi Static IP in Ubuntu Server
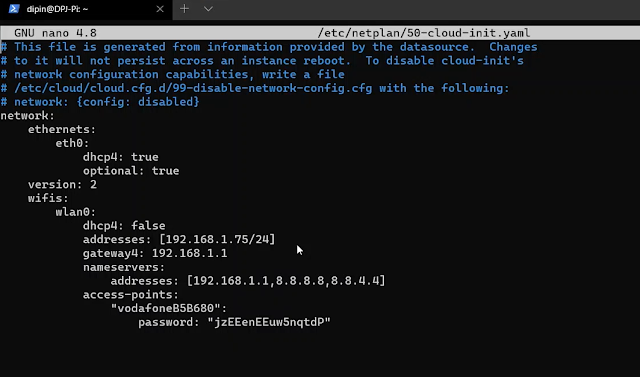
Moving to the important stuff, connecting to WiFi network and setting static IP. Ubuntu server uses netplan manager which takes and process .yaml files in path /etc/netplan directory. Go to the directory and start editing with nano/vim. Attach the below WiFi settings to your .yaml file replacing static IP, gateway, WiFi SSID and password. Also, remember the indentation. Don't use tabs and only do spaces(4 spaces for one tab).
wifis:
wlan0:
dhcp4: false
addresses: [192.168.1.75/24]
gateway4: 192.168.1.1
nameservers:
addresses: [192.168.1.1,8.8.8.8,8.8.4.4]
access-points:
"wifi-name":
password: "wifi-pass"

Now try to apply our new configuration with command
sudo netplan apply
If successful, remove LAN cable and turn on Raspberry Pi. It should boot and automatically connect to the specified WiFi network. Try ssh to Pi with static IP and you will see it's working. As the last setup, check internet access with aptitude update or something.
If you run into any issue, please use the comment section to let us know. Thanks for checking this out.
Comments
Post a Comment